Category: Uncategorized

  • Linerless Shipping Labels vs. Standard Thermal Rolls: What Actually Changes

    Linerless Shipping Labels vs. Standard Thermal Rolls: What Actually Changes

    The liner is the part of a shipping label you throw away. On a traditional die-cut roll, every label sits on a silicone-coated backing sheet that peels off at application and goes straight to the trash. Linerless labels remove that sheet entirely: the adhesive sits on the back of a continuous thermal facestock, and a release coating on the printed side keeps the roll from sticking to itself. The idea is simple, but the tradeoffs are real, and whether it saves you money depends on your printer, your label shapes, and how you apply them.

    What linerless actually means

    A linerless label is a continuous strip of direct-thermal material with adhesive on one face and a thin release topcoat on the other, wound into a roll with no backing paper between wraps. Because there is no pre-cut shape and no liner to index against, the printer treats the media as a ribbon and cuts each label to length on the fly. That single change, dropping the carrier sheet, is what drives every downstream benefit and every limitation worth knowing about.

    It is worth being precise about one point up front: current linerless technology is direct thermal only in practical terms. Thermal transfer versions exist but are not widely deployed, so if your labels need the abrasion and chemical resistance that a resin ribbon provides, linerless is not yet the answer. For everyday parcel labels that live a few days to a few weeks before delivery, direct thermal is the norm anyway.

    The throughput case: more labels per roll

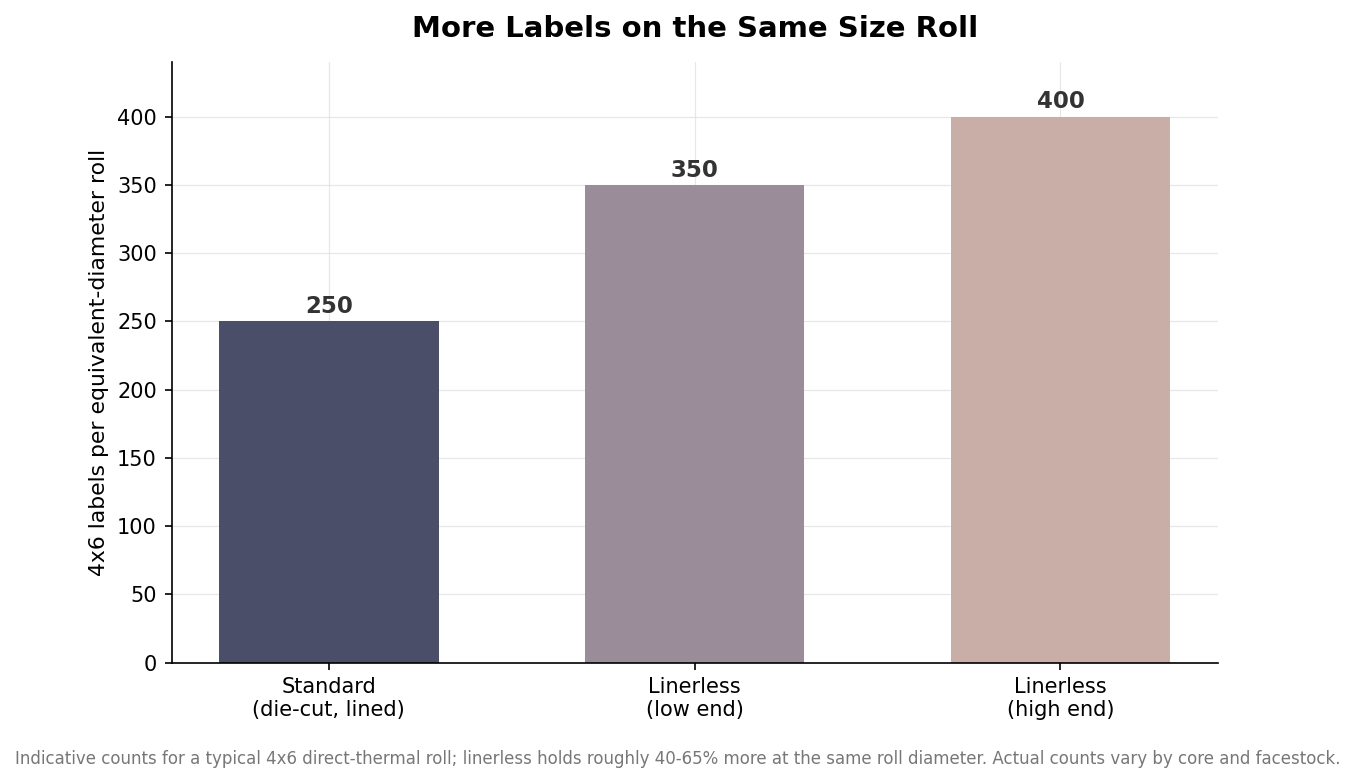
    The headline benefit is density. With no liner taking up thickness, a linerless roll fits substantially more label onto the same diameter of media. In practice that works out to roughly 40 to 65 percent more labels at an equivalent roll size. A common 4×6 direct-thermal roll that holds about 250 labels becomes a linerless roll of roughly 350 to 400 labels without growing any larger on the printer.
    Bar chart of 4x6 labels per equivalent-diameter roll: standard 250, linerless 350 to 400
    Linerless fits roughly 40-65% more labels on the same roll diameter; counts vary by core and facestock.

    Those numbers are indicative rather than fixed, because the exact count depends on core size, facestock thickness, and roll diameter. But the direction is consistent, and it compounds. More labels per roll means more parcels printed between reloads, which matters most in a pick-and-pack operation where a printer stopping for media is a person standing still.

    Fewer stops on the line

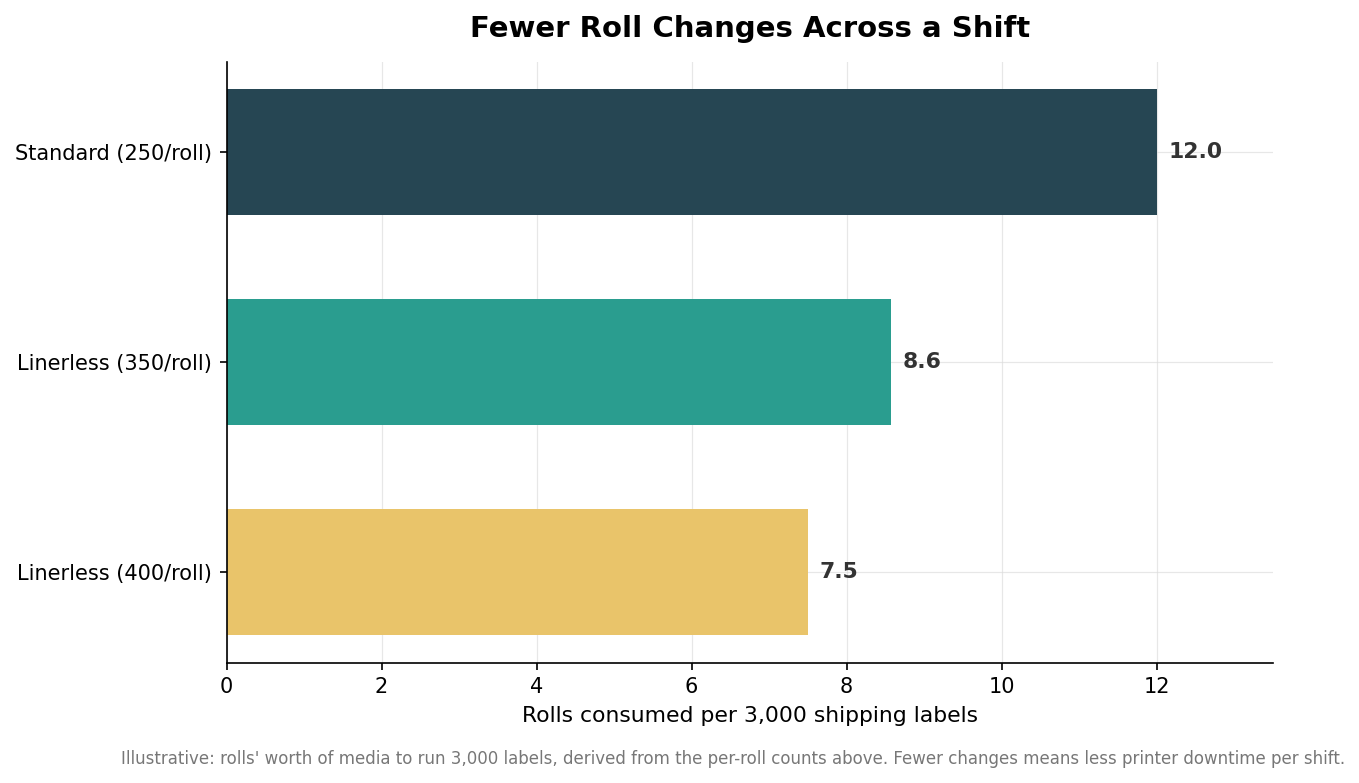
    Translate label density into roll changes and the operational picture gets clearer. To print 3,000 shipping labels, a standard 250-count roll needs twelve rolls’ worth of media and eleven changeovers along the way. The same job on linerless media at 350 to 400 labels per roll takes closer to eight rolls, cutting roughly a third of the reload stops.
    Bar chart of rolls consumed to print 3,000 labels: standard 12, linerless 8.6 at 350 per roll and 7.5 at 400 per roll
    Fewer rolls to run the same 3,000 labels, which means fewer reload stops per shift.

    Each avoided changeover is a small block of downtime: opening the printer, threading media, calibrating, and clearing the first misprint. Individually these are seconds to a minute, but across a shift and a fleet of printers they add up to real recovered throughput, plus the waste and disposal cost of every liner you no longer buy or bin. For high-volume shippers, that recovered time is usually the number that justifies the switch, ahead of the sustainability story.

    What your printer needs

    Here is the catch that surprises buyers: you cannot simply load linerless media into a standard thermal printer. Because adhesive is exposed on the back of the strip, it touches the platen roller and the cutter on every label. A standard rubber platen accumulates adhesive and fails within a short run, so linerless printers use a silicone-coated platen roller that releases cleanly. Likewise the cutter needs a non-stick coated blade to avoid gumming up, since it slices through adhesive on every cut rather than through a clean liner gap. The printer also has to support variable-length cutting, because linerless media has no die-cut registration marks to tell it where one label ends and the next begins.

    None of this is exotic, but it means linerless is a printer decision, not just a media decision. If your existing fleet is standard desktop or industrial direct-thermal units, moving to linerless usually means new or upgraded printers, and that capital cost has to be weighed against the per-shift media and labor savings. The math tends to favor linerless as volume rises, and favors staying put at low volume.

    Where standard lined labels still win

    Linerless is not a universal upgrade. Because the cutter produces rectangular cuts, any label that needs a specific die-cut shape, rounded corners, or an odd contour still requires liner-based media. Hand application also changes: without a liner to peel, workers apply labels differently, and operations that rely on peel-and-stick by hand or on automatic applicator pads built for lined stock may find the workflow does not transfer cleanly. And as noted, if the application demands thermal transfer durability, refrigerated or long-life adhesion, or a facestock that direct thermal cannot provide, the lined roll remains the right tool.

    The honest way to decide is by volume and shape. If you are printing high volumes of plain rectangular 4×6 parcel labels on printers you are willing to spec for it, linerless recovers media, storage, freight, and reload time in a way that shows up quickly. If your labels are low-volume, oddly shaped, applied by hand off a liner, or need transfer-grade durability, standard die-cut rolls are still the safer specification. Match the media to the job rather than the trend, and the savings, where they exist, will be real.
  • How Long Do Thermal Shipping Labels Last? Lifespan, Fading, and Storage

    How Long Do Thermal Shipping Labels Last? Lifespan, Fading, and Storage

    The honest answer to how long a thermal shipping label lasts is that it depends almost entirely on how the label was printed. A standard direct thermal label — the kind that rolls out of most desktop shipping printers with no ink or ribbon — keeps a crisp, scannable image for roughly six months to a year under normal indoor conditions. A thermal transfer label printed with a resin ribbon can stay legible for five to ten years or more. Both look identical the day they come off the printer, which is exactly why so many shippers get caught out later.

    For most parcels this difference never matters, because the label only has to survive a few days in transit. It starts to matter the moment a label needs to sit in a warehouse for a season, ride through a hot trailer, come back as a return months later, or satisfy a regulator who expects the marking to still be readable a year on. This guide walks through what actually fades, how long each method realistically holds up, and how to store and specify labels so they last as long as the job needs.

    What actually fades on a thermal label

    Direct thermal printing has no ink. The label stock is coated with a heat-sensitive layer containing a colorless dye and an acidic developer; the printhead applies heat in the pattern of your barcode and text, the two react, and the image appears. That same chemistry is the weakness. Anything that supplies energy or reactive chemicals to the coating after printing will keep the reaction going — or reverse it — until the image darkens into a gray smear or fades toward blank.

    Heat is the fastest enemy. Leave a direct thermal label on a dashboard, near a heat source, or in an un-air-conditioned trailer in summer and the whole coating can turn dark and unreadable within days. Ultraviolet light from direct sunlight or strong indoor lighting bleaches the image over weeks. Moisture and humidity cause smudging and can lift adhesive. Abrasion from labels rubbing against each other or against conveyor rollers physically wears the printed layer away. And plasticizers and solvents — the oily compounds that migrate out of PVC shrink wrap, vinyl, and some cardboard coatings, plus common cleaning chemicals — dissolve the image on contact. Thermal transfer avoids most of this because the image is a solid ribbon material fused onto the surface rather than a reaction baked into the paper.

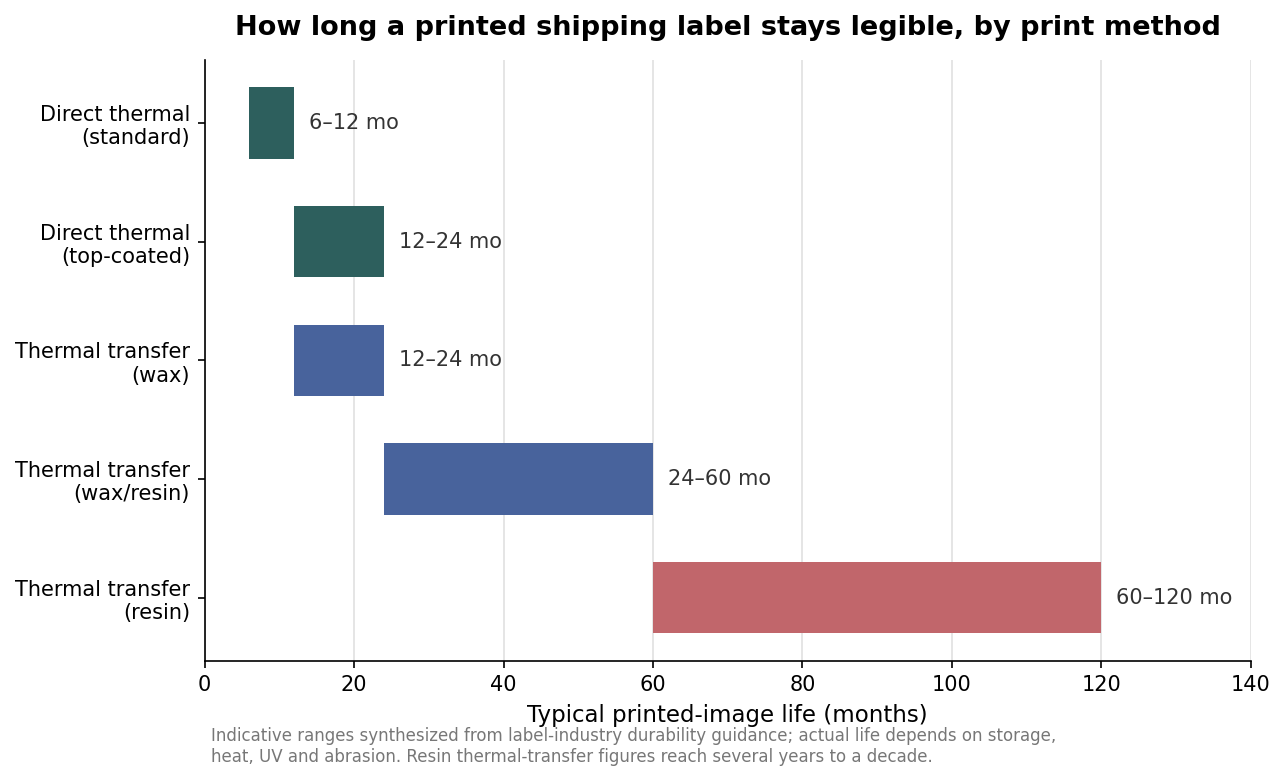
    Horizontal range bars showing typical printed-image life in months for direct thermal, top-coated direct thermal, and wax, wax-resin, and resin thermal transfer labels
    Indicative printed-image lifespan by method: standard direct thermal runs 6-12 months while resin thermal transfer can reach five to ten years.

    Realistic lifespans by print method

    Treat the following as indicative ranges rather than guarantees, because storage and exposure move them substantially. Standard direct thermal holds a scannable image for about six to twelve months. A top-coated direct thermal stock, which adds a protective layer over the reactive coating, pushes that toward one to two years and resists mild moisture and handling far better — a worthwhile upgrade if labels may sit before use or face damp environments.

    Thermal transfer spans a much wider range depending on the ribbon. A wax ribbon, the cheapest, behaves a lot like a good direct thermal label in the one-to-two-year band but smears less. A wax-resin blend moves you into the multi-year range with better scratch and smear resistance. A full resin ribbon on a synthetic facestock is the archival option, holding up for five to ten years and shrugging off heat, chemicals, and abrasion that would destroy a direct thermal label in an afternoon. The trade-off is cost and complexity: thermal transfer requires buying and loading ribbons, and resin ribbons on synthetic stock are the most expensive consumable of the group.

    Why direct thermal is still the right default for parcels

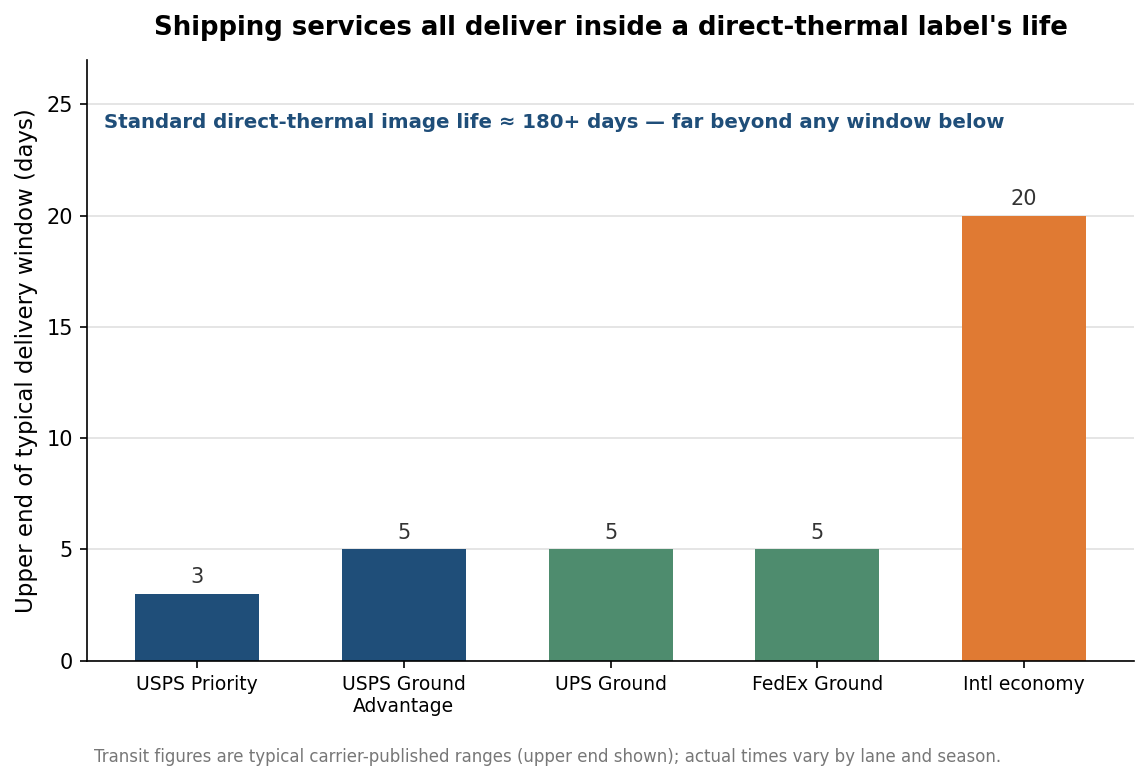
    None of this means direct thermal is a poor choice — for the majority of shipments it is the correct and most economical one. The reason is timing. A shipping label’s real job ends when the parcel is delivered and scanned, and almost every common service completes that trip in a handful of days. Domestic ground and priority services in the United States typically deliver within one to five business days, and even economy international parcels usually clear in two to three weeks. Against a direct thermal image life measured in months, every one of those windows sits comfortably inside the margin.

    Bar chart of typical upper-end delivery times in days for USPS Priority, USPS Ground Advantage, UPS Ground, FedEx Ground, and international economy, all well under a direct thermal label's life
    Common shipping services deliver in days to a few weeks, well inside a direct thermal label’s roughly 180-day image life.

    So the practical rule is to match the label to the longest job the label has to survive, not the average one. If your parcels are printed and shipped the same week, standard direct thermal is cheaper, faster, and entirely adequate. You only need to reach for a more durable construction when a label must outlive the delivery: goods stored for months before dispatch, returns labels that may be applied long after they were printed, cold-chain or outdoor exposure, or asset and compliance markings that regulators expect to remain scannable for a year or more.

    Storing labels so they reach their rated life

    Storage decides whether a label reaches the top or the bottom of its range, and this applies both to unprinted stock and to printed labels waiting to be used. Keep thermal media in a cool, dark, dry place: a controlled room temperature around 18 to 22 degrees Celsius (roughly 65 to 72 Fahrenheit) and relative humidity below about 50 percent is the widely recommended envelope. Unprinted direct thermal rolls generally carry a shelf life of six to twelve months from manufacture, so rotate stock first-in-first-out rather than hoarding a year’s supply.

    Beyond temperature and humidity, keep printed labels away from direct sunlight and off surfaces that shed plasticizers — do not store them pressed against PVC binders, vinyl, or freshly printed solvent materials, and avoid adhesive tapes laid directly over a direct thermal image. If labels will face any of those conditions in normal use, that is your signal to specify a top-coated direct thermal or a thermal transfer construction from the start, rather than trying to protect an unsuitable label after the fact.

    A quick way to decide

    Start by asking how long the printed label must stay scannable, then add a comfortable margin. If the answer is days to a few weeks and the labels are stored indoors, standard direct thermal is the sensible, low-cost default. If the answer is several months, or the labels face heat, sunlight, moisture, or chemical contact, move up to top-coated direct thermal for a modest premium. If the answer is measured in years, or a barcode must survive harsh handling and still scan, specify thermal transfer with a wax-resin or resin ribbon on a synthetic facestock. Buying a decade of durability for a parcel that delivers in three days wastes money; printing a multi-year asset tag on bare direct thermal wastes the whole label. The method, not the brand, is what sets the lifespan.

  • Label Adhesives Explained: Why Shipping Labels Fall Off, and the Spec That Fixes It

    Label Adhesives Explained: Why Shipping Labels Fall Off, and the Spec That Fixes It

    When a shipping label falls off, the facestock almost never failed; the adhesive did. Industry selection guides are blunt about it: the wrong adhesive is the single most common cause of label failure, and it is also the line item buyers spend the least time specifying. The label looks identical on the roll whether it carries a standard acrylic, a high-tack rubber formula, or a freezer-grade adhesive, so the mistake only shows up weeks later as a carton in a cold warehouse with a curling corner where the barcode used to be. This guide covers the adhesive families that matter for shipping and barcode labels, the two temperature numbers on every datasheet, and the surface-energy problem behind labels that will not stick to poly mailers and recycled cardboard.

    The four families that cover almost every shipping job

    Standard permanent acrylic is the default on stock shipping labels: clean, stable, resistant to yellowing, and happy on paper, glass, metal, and smooth higher-energy plastics in ambient conditions. Removable acrylic trades holding power for clean release; it belongs on returnable totes, glass, and retail surfaces where residue is unacceptable, not on outbound cartons. High-tack and rubber-based permanents exist for the surfaces standard acrylic cannot grip: polyethylene and polypropylene film, textured or dusty board, and cold, damp, or slightly oily conditions. Rubber hot-melt formulas grab hardest and fastest, with the published trade-off that they age and yellow under UV faster than acrylics, which rarely matters inside a shipping lane. Cold-temperature and freezer-grade acrylics are chemistry tuned to stay flexible below the point where standard formulas stiffen; selection guides note that a standard adhesive may function at freezing yet effectively crystallize by minus 20 Celsius, which is exactly the range a frozen-goods label lives in.

    The two numbers that matter: application and service temperature

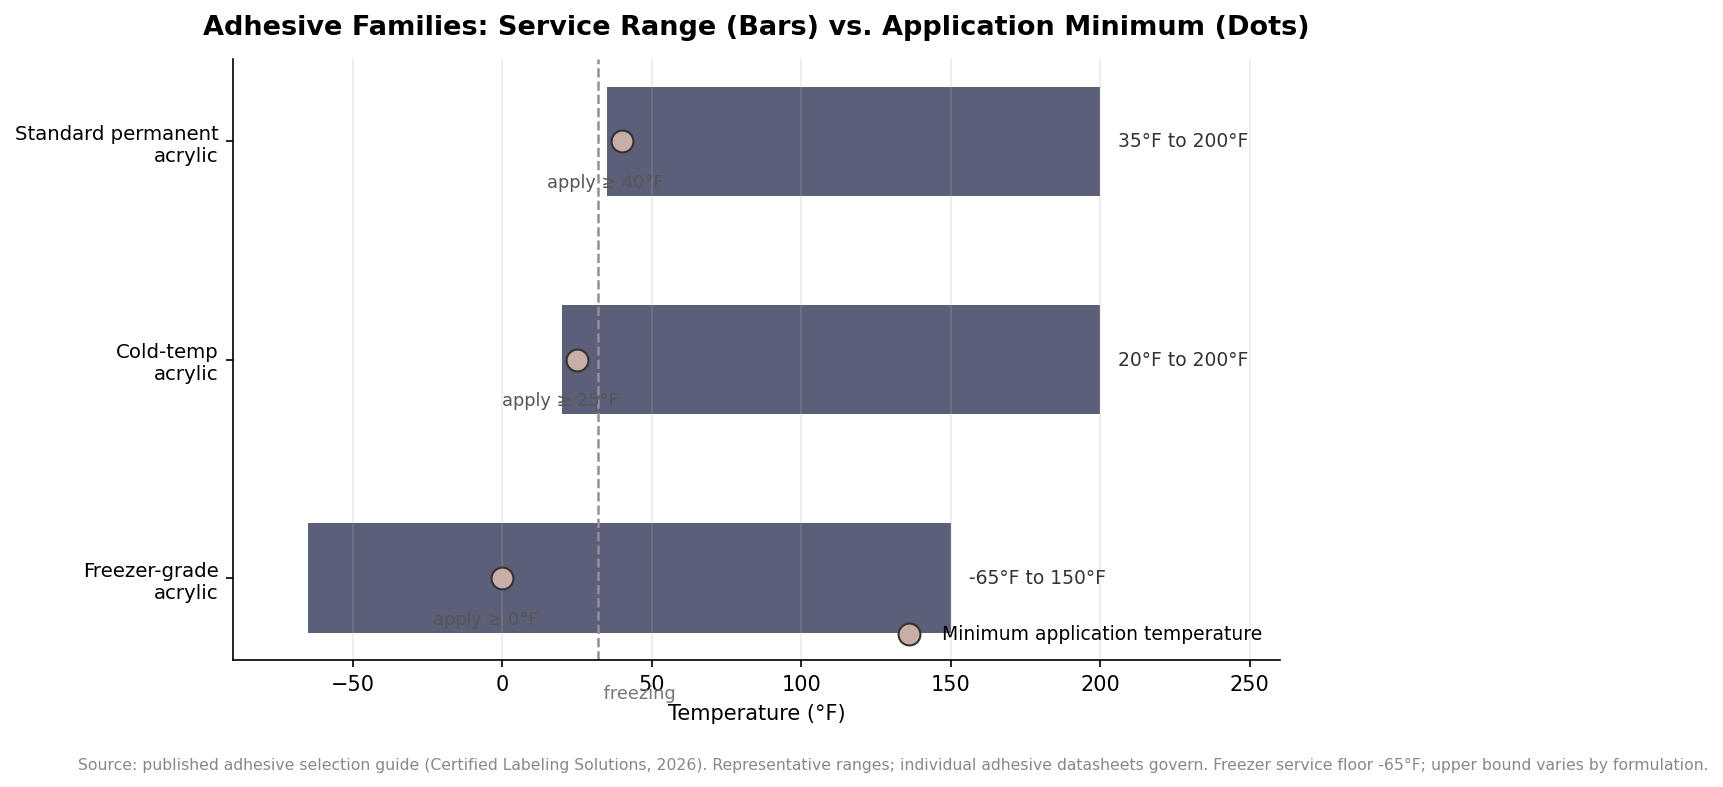
    Every adhesive datasheet carries two temperatures buyers routinely confuse. The minimum application temperature is the coldest the label and surface can be at the moment of sticking; below it, the adhesive cannot flow into the surface and never forms a full bond. The service range is what the bond tolerates after it has set. Published figures for a standard permanent acrylic run around a 40°F application minimum with a service range of roughly 35°F to 200°F. Cold-temperature acrylics push application down to about 25°F and service to 20°F. Freezer-grade formulas apply at 0°F and hold to published floors around minus 65°F. The order of operations is the trap: a label applied warm and then frozen usually survives, while the same label applied to an already-cold carton fails immediately, because it never bonded in the first place. If cartons are labeled inside a chilled dock, spec by the dock temperature, not the warehouse the truck departs from.

    Floating bar chart showing service temperature ranges for standard, cold-temp, and freezer-grade acrylic adhesives, with dots marking each family's minimum application temperature
    The two datasheet numbers that decide cold-chain survival: bars show what the set bond tolerates, dots show the coldest surface you can apply to.

    Condensation is the second cold-chain antagonist. When a cold carton meets warm air, moisture films over the surface immediately and physically blocks adhesive contact. No adhesive bonds through standing water, so the fix is procedural as much as chemical: label before chilling where possible, or wipe and label fast, and favor high-tack formulas that wet out quickly.

    Surface energy: why the poly mailer wins

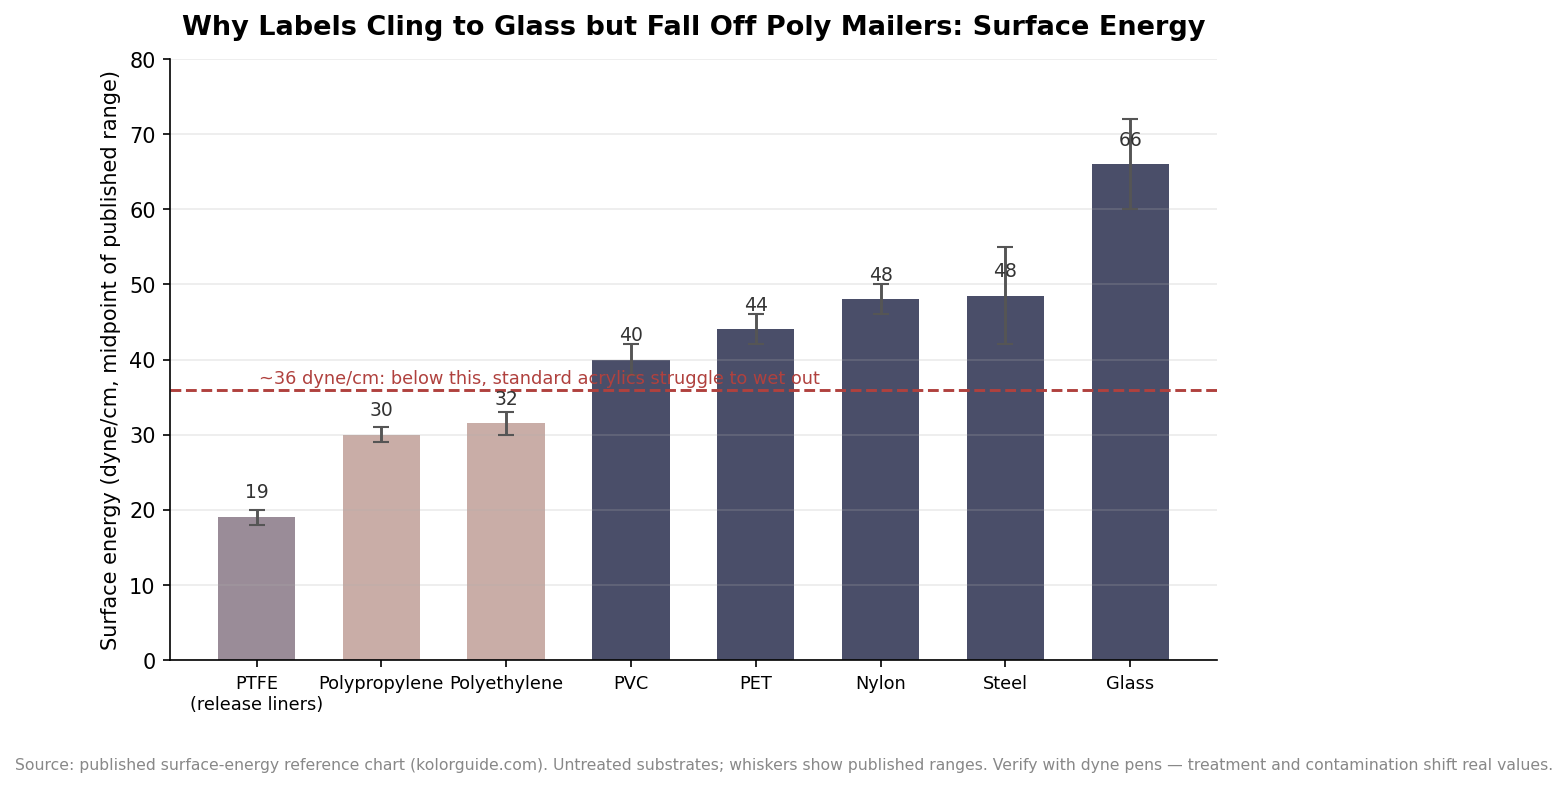
    Adhesion is physics before it is chemistry. An adhesive bonds by flowing across a surface, and how well it spreads depends on the surface’s energy, measured in dyne per centimeter. Published reference charts put glass at 60 to 72 dyne and steel at 42 to 55, which is why almost anything sticks to them. Untreated polyethylene sits at 30 to 33 and polypropylene at 29 to 31, low enough that a standard acrylic beads up instead of wetting out, and PTFE, the stuff of release liners, sits at 18 to 20, which is precisely why your labels peel off their backing so easily. The practical threshold most converters use is around 36 dyne: above it, standard permanents perform; below it, you need a high-tack or rubber-based formula designed for low-energy surfaces.

    Bar chart of published surface energy for eight packaging materials in dyne per centimeter, with a dashed line near 36 dyne below which standard acrylic adhesives struggle
    Published surface-energy ranges: glass and steel sit far above the ~36 dyne wet-out threshold, while untreated PE and PP mailers sit below it.

    This is the whole story behind labels that fall off poly mailers and polyethylene bags: the surface is low-energy, and the cure is specifying an adhesive rated for PE and PP rather than blaming the printer. Recycled corrugated fails for a related reason; the surface energy is adequate, but the loose recycled fibers and dust shear away under the label, taking the bond with them. High-initial-tack formulas that grab the fiber layer fast are the standard answer, and the published guidance to verify with a dyne pen before a big run is cheap insurance, since surface treatments and contamination shift real-world values well away from the reference chart.

    Writing the adhesive line on your label spec

    A complete adhesive spec is four short statements. Name the surface exactly, including whether the corrugated is virgin or recycled and whether mailers are PE film. State the coldest application temperature in your process, measured at the surface, not the room. State the full service range the shipment will see, from freezer to a summer trailer, where published ranges for standard acrylics top out around 200°F. And state removability: permanent for outbound shipping labels, removable only where residue-free release is a requirement. Give those four lines to your converter and let them name the adhesive; they carry a dozen formulations and will match one to the spec. Order a sample roll and test it on your actual cartons through your actual process, including a night in the freezer if that is where the product lives, because the datasheet describes laboratory steel and glass panels, and your dusty recycled double-wall is neither. A one-week adhesion test costs almost nothing; relabeling a pallet of frozen inventory, or losing a shipment because the barcode landed on the warehouse floor, does.

  • How to Spec Thermal Label Rolls: Core Size, Roll Diameter, and Wind Direction

    How to Spec Thermal Label Rolls: Core Size, Roll Diameter, and Wind Direction

    Most buyers specify a shipping label by its size and its print method, approve the artwork, and consider the job done. Then the first case of rolls arrives, the roll will not seat on the spindle, or the printer feeds two labels at once and reports a media error. The culprit is almost never the label face. It is the roll geometry: the core, the outer diameter, the direction the labels are wound, and how the printer senses where one label ends and the next begins. None of that shows up in a proof, which is exactly why it gets missed. Here is how to specify a thermal label roll so it runs the first time.

    Roll geometry decides whether the printer cooperates

    A thermal label roll has to physically fit the printer before anything else matters. Two dimensions govern that fit: the core, the cardboard tube the labels are wound onto, and the maximum outer diameter, how large the full roll is before it is used. A roll with the wrong core will not seat on the spindle, and a roll whose full diameter exceeds what the printer’s media compartment can hold simply will not close. Get these two numbers right and most feeding problems disappear; get them wrong and no amount of good artwork saves the run.

    Core size and maximum roll diameter

    Core size sorts cleanly by printer class. Desktop printers such as the Zebra ZD410 and ZD420 or a Rollo take a 1-inch core and typically accept a roll up to roughly 5 inches in outer diameter. They suit operations printing up to a few hundred labels a day. Industrial printers such as the Zebra ZT230 and ZT411 or comparable TSC units use a 3-inch core and accept a larger roll, commonly up to about 8 inches in diameter, which is what lets them run thousands of labels between reloads. A 3-inch-core roll will not fit a desktop printer’s 1-inch spindle without an adapter, and a small 1-inch roll rattles loosely on an industrial spindle. Match the core to the machine you actually own before you compare anything else.

    A 1.5-inch core shows up occasionally on certain mid-range and mobile units, so if your printer is neither a plain desktop nor a full industrial machine, check the spec before assuming one of the two common sizes. Core adapters do exist and can let a smaller roll ride on a larger spindle, but they add a step to every reload and a part that can be lost, so they are a workaround rather than a plan. The cleaner path is to buy the roll in the core the printer was built for. If you run more than one printer model across a warehouse, standardizing on a single printer class, and therefore a single core size, keeps your label inventory from splintering into rolls that only fit one machine.

    How many labels a roll holds, and how often you reload

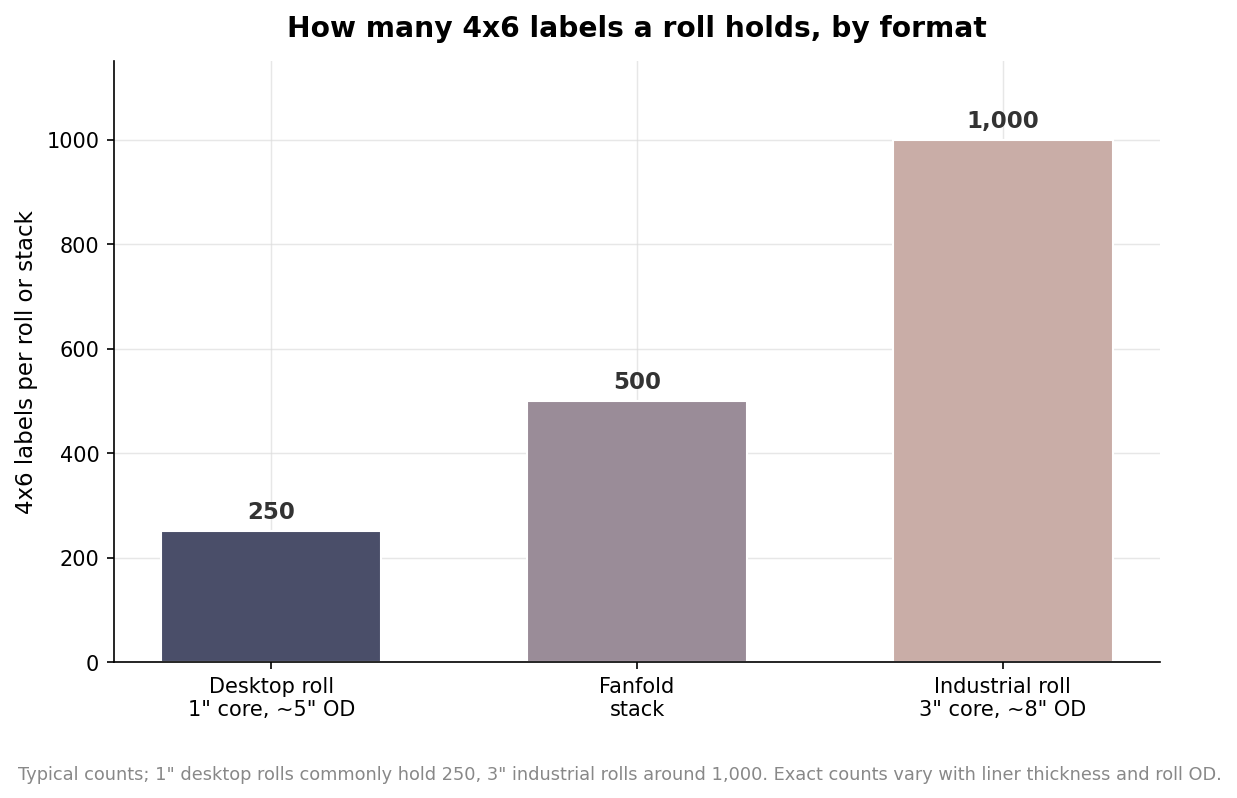
    Outer diameter and core together set how many labels a roll carries. For the common 4 by 6 inch shipping label, a 1-inch-core desktop roll typically holds around 250 labels, a fanfold stack holds on the order of 500, and a 3-inch-core industrial roll holds roughly 1,000. Treat these as typical counts rather than guarantees, because liner thickness and the exact roll diameter move them.

    Bar chart of 4x6 labels per roll by format: desktop roll 250, fanfold stack 500, industrial roll 1,000
    Typical 4×6 label counts by roll format; the 3-inch industrial roll carries about four times a desktop roll.

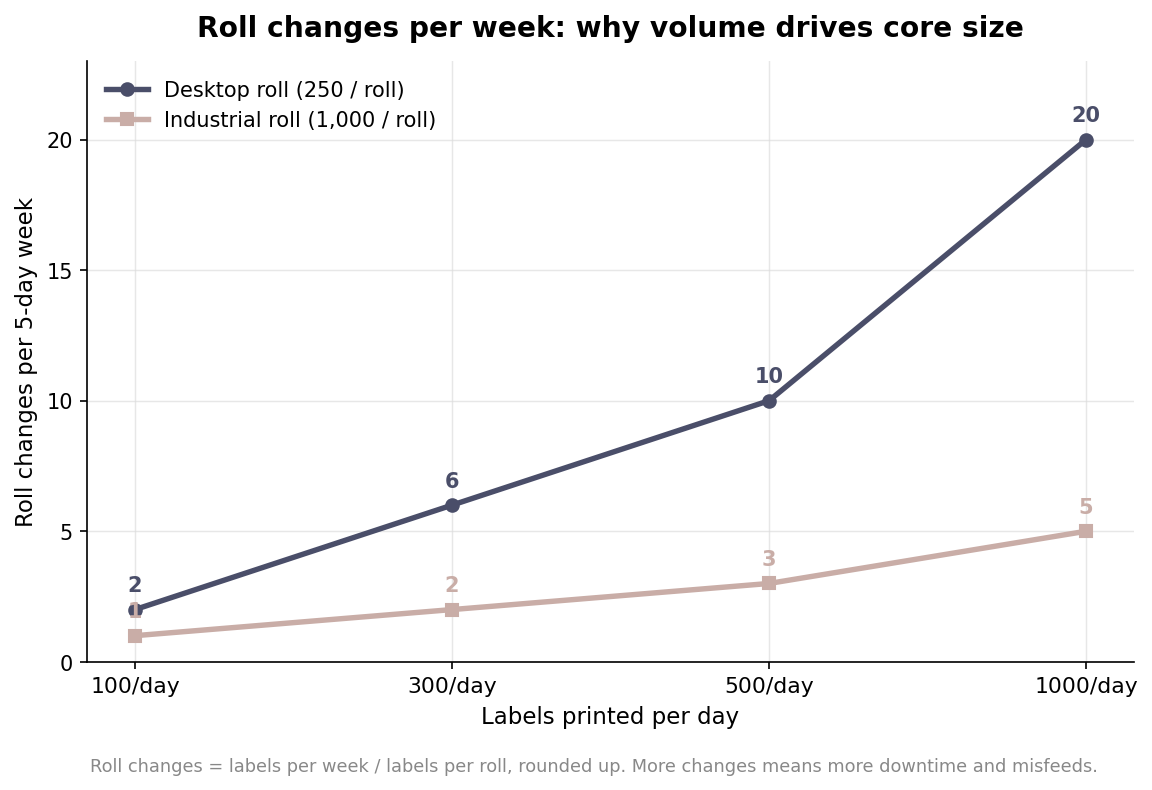
    The label count matters less on its own than for what it does to your reload cadence. Every roll change is a small interruption: the operator stops, threads new media, recalibrates, and sometimes wastes a label or two getting alignment back. At low volume that is trivial. At higher volume it compounds fast, which is the real argument for a 3-inch core.

    Line chart of roll changes per week versus daily volume, comparing 250-count desktop rolls to 1,000-count industrial rolls
    Weekly roll changes by daily volume, showing why higher throughput favors a 3-inch core.

    Reading the second chart, a shop printing 500 labels a day burns through ten desktop rolls a week but only three industrial rolls, and at 1,000 a day the gap widens to twenty against five. If your volume is climbing, specifying the larger core is less about the labels and more about buying back the operator’s time and reducing the chances of a misfeed on a busy afternoon.

    Wind direction, orientation, and sensing

    Wind direction describes which way the label face points as it comes off the roll. Labels are either wound out, with the printable face on the outside of the roll, or wound in, with the face toward the core. The printer’s manual states which winding it expects, and getting it backwards means the thermal head prints on the liner instead of the label. Alongside winding, confirm the label orientation and that there is a perforation or gap between labels so they tear or peel cleanly. The other setting that trips people up is sensing. Die-cut labels leave a small gap of exposed liner between each label, and most printers use a transmissive gap sensor to find it. Some media instead carries a printed black mark on the back that a reflective sensor reads. The two are not interchangeable: continuous or black-mark stock fed to a printer set for gap sensing will not index correctly, so the media type has to match the sensor mode the printer is set to.

    Putting it on the spec sheet

    When you order, write down six things and the roll will run: label size, core diameter, maximum roll outer diameter, labels per roll, wind direction, and sensing type, plus whether you want roll or fanfold. Fanfold is worth a mention here because a fanfold stack sits outside the printer, runs cooler, curls less, and is not limited by media-compartment diameter, which makes it a quiet upgrade for high-volume desktop setups. Confirm each of those six against your specific printer model before approving a production run, and the labels that arrive will load, index, and print without a single media error on the first case.

  • Standard Shipping Label Sizes: 4×6 and the Full Size Chart

    Standard Shipping Label Sizes: 4×6 and the Full Size Chart

    Almost every shipping label question eventually lands on one number: the size. Order the wrong dimensions and the carrier’s generated label will not fit the media, barcodes get clipped at the edges, or you burn through rolls twice as fast as you planned. This is a reference to the sizes that actually matter, why one of them dominates, and how the roll or fanfold format underneath the size changes what your printer can do. Sizes here are written width by height in inches, the way label suppliers quote them.

    Why 4×6 became the default

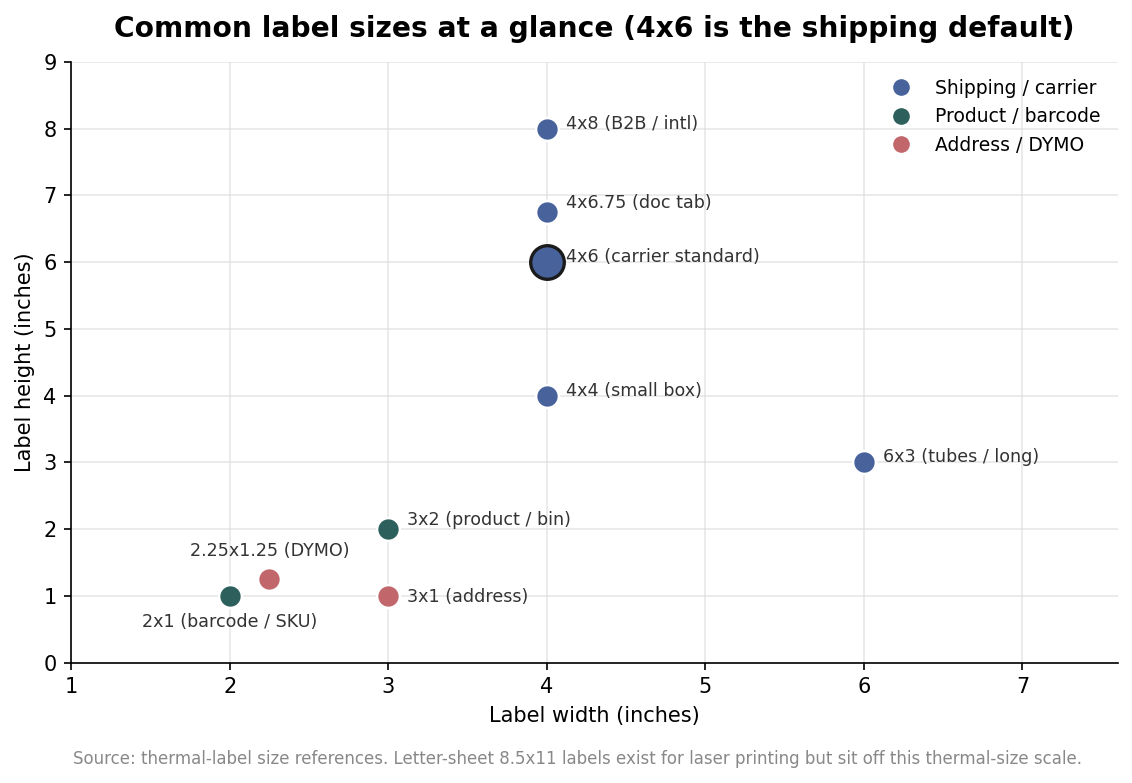
    The 4×6 inch label, about 100 by 150 millimeters, is the standard used by essentially every major carrier, including USPS, UPS, FedEx, and DHL, and it is what marketplace platforms like Amazon expect for fulfillment. That near-universal agreement is the whole point: a 4×6 gives enough room for the routing barcode, the tracking number, the addresses, and the carrier’s service markings without crowding, and it matches the print width of the desktop thermal printers most sellers own. If you do nothing else right, ordering 4×6 direct thermal labels will keep you compatible with the label your shipping software spits out. A close cousin, the 4×6.75, adds a tear-off documentation tab that some FedEx and UPS workflows use, so check whether your carrier account generates that longer format before you commit to a size.

    The size chart, from 2×1 to 4×8

    Below the shipping standard sits a whole family of smaller formats built for different jobs. A 2.25×1.25 is the classic DYMO-style address and UPC label. A 2×1 is a tight barcode or SKU sticker, a 3×1 suits a simple address line, and a 3×2 is a common product or warehouse bin label. Move up in size and you get the 4×4 or 4×4.25 for small boxes and local parcels, the 6×3 for tubes and long packages, and the 4×8 for heavier B2B and international shipments that need extra room for customs and handling marks. There is also the 8.5×11 letter sheet, printed on a laser or inkjet with multiple labels ganged per page, which sits well outside the thermal-roll world but still shows up in low-volume and office settings.

    Scatter plot of common label sizes by width and height in inches, highlighting 4x6 as the carrier standard
    Common label sizes plotted by width and height, with 4×6 as the shipping default.

    The pattern to notice is that width tends to cluster at four inches because that is the working width of the machines doing the printing, while height stretches to suit the amount of information the label has to carry. When in doubt, pick the smallest size that comfortably holds your content plus a clear margin, because a label that is larger than it needs to be wastes stock and can overhang the package edge.

    Rolls, cores, and fanfold: the format under the size

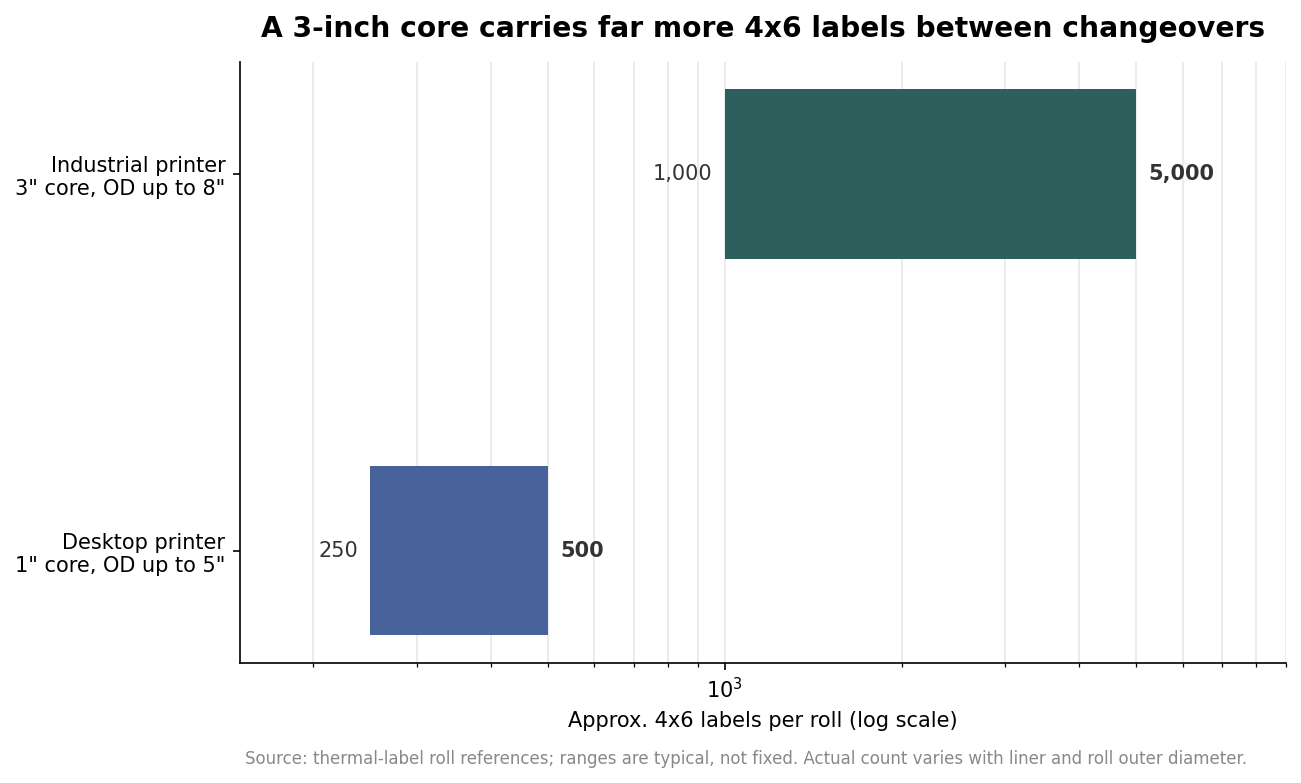
    Two labels can share the same 4×6 dimensions and still behave very differently depending on how they are wound and fed. Roll labels are specified by their core, the cardboard tube in the center, and their outer diameter. Desktop printers such as the Rollo, DYMO 4XL, and Zebra ZD421 take a one-inch core with an outer diameter up to about five inches, which works out to roughly 250 to 500 4×6 labels on a roll. Industrial machines like the Zebra ZT411 or Honeywell PM43 use a three-inch core and accept much larger rolls, up to about an eight-inch outer diameter, holding somewhere in the range of 1,000 to 5,000 labels before a changeover.

    Range chart comparing approximate 4x6 labels per roll for a 1-inch desktop core versus a 3-inch industrial core on a log scale
    The core size, not the label size, sets how many labels fit on a roll.

    Fanfold labels take a different approach entirely, stacking flat and feeding from behind or beneath the printer rather than off a spool. The advantage is volume without interruption: a single fanfold stack can hold thousands of labels, and because it lies flat there is no curl to fight, which many high-throughput warehouses prefer. The trade-off is the desk space the stack occupies and a feed path that not every desktop printer supports. If you print in bursts of a few dozen a day, a one-inch-core roll is simpler; if you are labeling pallets of orders, the three-inch roll or a fanfold box keeps you from reloading every hour.

    Match the size to the job and the printer

    Work backward from two constraints. First, the label your carrier or platform generates, since that fixes the shipping label at 4×6 in most cases and there is little value in fighting it. Second, the print width of your hardware, because a desktop thermal printer tops out around a four-inch label width and will simply not run a five- or six-inch-wide sheet no matter what size file you send it. For the smaller product, barcode, and address labels, choose by content: a single scannable barcode with a short human-readable line fits a 2×1, while a barcode plus a few lines of product detail wants a 3×2. Leave a quiet zone, a clear unprinted margin of roughly an eighth of an inch, around any barcode so scanners can find the start and stop bars reliably.

    One last practical note on ordering: confirm whether your printer is direct thermal or thermal transfer before buying stock, because the media is not interchangeable even at identical sizes, and confirm the core size your printer’s spindle actually accepts. Figures here for roll counts and diameters are typical rather than fixed, and they shift with liner thickness and how tightly a roll is wound, so treat them as planning numbers and verify against the exact product you order. Get the size and format right up front and the rest of the label, from artwork to scan rate, gets much easier to control.

  • How Many Custom Shipping Labels Should You Order? — Customized Shipping Labels

    Call or Text us: (929) 605-4397

    HomeBlog › How Many Custom Shipping Labels Should You Order?

    Ordering

    How Many Custom Shipping Labels Should You Order?

    07/02/2026

    Ordering custom shipping labels for the first time, most operations either wildly overestimate a launch or badly underestimate a peak season — and both mistakes cost money. Overordering ties up budget and warehouse space in labels that sit on a shelf; underordering means a rushed reorder at a worse per-label price right when your volume is highest.

    The good news is the math is simpler than it looks once you tie the number to your actual shipping volume, because a daily pack line, a seasonal spike, and a slow-moving specialty label all follow different logic.

    Start with your daily shipping volume

    Before picking a quantity, look at how many parcels you ship per day and per month across your channels. A shop shipping 100 orders a day burns roughly 2,000 address labels a month; add handling, return, and barcode labels and the total climbs. Base your order on that real throughput, not a round number that feels safe, and you’ll size close on the first pass.

    Build in a buffer for misprints and peaks

    Add 10–15% to your run for printer misfeeds, damaged labels, void-and-reprints, and the inevitable demand bump. If you ship 20,000 parcels a quarter, order closer to 22,500 labels. Because our minimum is 250 and per-label cost drops as volume grows, rounding up to the next tier is often cheaper per unit than ordering exactly what you counted.

    Plan seasonal peaks separately

    If your business has a Q4 or promotional spike, forecast that window on its own and order for it ahead of time. Label lead time is 5–7 business days, but printers and stock tighten industry-wide before peak, so ordering your holiday labels in early fall avoids both a rush fee and a stockout at the worst possible moment.

    Recurring programs: order a quarter or year at once

    For a steady operation, ordering a full quarter or year of labels at once usually beats ordering in small batches on price and keeps you from ever running dry mid-week. Split the order by facestock — a large run of 4×6 direct-thermal for the pack line, smaller runs of BOPP or Kraft for specialty parcels — and combine the volume for better pricing.

    Program typeHow to size itTypical order
    Daily fulfillmentMonthly parcel count + 10–15%2,500–25,000 / month
    Seasonal / Q4 peakForecast the window, order early10,000–100,000+
    Specialty (BOPP, Kraft)Lower volume, order by quarter250–5,000 per run
    Multi-warehouseCombine volume for pricing50,000–millions
    Key takeawaySize your run off your real monthly parcel count plus a 10–15% buffer, and forecast seasonal peaks separately and order them early to dodge both rush fees and stockouts.

    The fastest way to get this right is to tell us your monthly shipping volume and facestock mix when you request a quote — we’ll ask the right follow-up questions and recommend a quantity that fits your budget and your calendar instead of leaving you to guess.

    More posts

  • Direct Thermal vs. Thermal Transfer: Which Label Print Method? — Customized Shipping Labels

    Call or Text us: (929) 605-4397

    HomeBlog › Direct Thermal vs. Thermal Transfer: Which Label Print Method?

    Buyer guides

    Direct Thermal vs. Thermal Transfer: Which Label Print Method?

    06/16/2026

    The single most confusing decision on any thermal label order isn’t the size or the facestock — it’s the print method. Direct-thermal and thermal-transfer look similar on the printer but behave very differently in the real world, and most operations only need to answer a few questions to know which one is right.

    Neither is objectively better. The right choice depends on how long the label must last, what conditions it faces, and whether you want to run ribbons at all.

    What direct-thermal does best

    Direct-thermal printing uses heat to develop an image directly on a chemically-coated facestock — no ribbon required. That makes it cheap, fast, and low-maintenance, which is why it dominates 4×6 carrier labels and high-volume pack lines. The trade-off is longevity: direct-thermal images can darken or fade under prolonged heat, friction, or sunlight, so it’s ideal for parcels in transit and short-term use, not long-term storage.

    What thermal-transfer does best

    Thermal-transfer printing melts a wax or resin ribbon onto the facestock, producing a dense, durable image that resists heat, moisture, chemicals, and abrasion. It’s the method for barcodes that must scan weeks or months later, for cold-chain and outdoor labels, and for synthetic facestocks like BOPP. You pay for ribbon and a little more setup, but you get a mark that survives.

    Cost and workflow differences

    Direct-thermal has a lower running cost because there’s no ribbon and less to maintain, and it’s the simplest workflow for an e-commerce pack station. Thermal-transfer costs a bit more per label and requires matching the ribbon to the facestock, but it’s the only choice when durability is non-negotiable. Many operations run both: direct-thermal for outbound parcels, thermal-transfer for inventory and compliance.

    Matching method to your labels

    As a rule of thumb: direct-thermal for 4×6 shipping labels that get scanned within days; thermal-transfer for barcodes, BOPP weatherproof labels, cold-chain, and anything that must stay legible over time. Tell us the label’s job and lifespan and we’ll spec the method and stock together.

    FactorDirect thermalThermal transfer
    Ribbon neededNoYes (wax / resin)
    Best forCarrier labels, transitBarcodes, cold chain, BOPP
    DurabilityFades over time / heatSmudge- & abrasion-proof
    Running costLowerSlightly higher
    FacestocksDirect-thermal paperPaper & synthetic film
    Key takeawayChoose direct-thermal for ribbon-free 4×6 labels scanned within days; choose thermal-transfer for durable barcodes, BOPP, and cold-chain labels that must stay legible over time.

    Still deciding? Tell us your printer, your label’s job, and how long it needs to last, and we’ll recommend a method and facestock as part of your free mockup — and split the order across both if it makes sense.

    More posts

  • BOPP vs. Paper Shipping Labels: Choosing a Facestock — Customized Shipping Labels

    Call or Text us: (929) 605-4397

    HomeBlog › BOPP vs. Paper Shipping Labels: Choosing a Facestock

    Buyer guides

    BOPP vs. Paper Shipping Labels: Choosing a Facestock

    06/01/2026

    After print method, the next facestock decision is material: coated paper or BOPP synthetic film. They sit at opposite ends on price and durability, and the right pick comes down to the conditions your label will actually face between the pack station and the scan.

    Paper is cheaper and perfectly good for most parcels; BOPP is the armor you reach for when moisture, cold, oil, or abrasion would destroy a paper label.

    What coated paper does best

    Coated paper facestock is the economical default for the vast majority of shipping labels. It prints cleanly, takes both thermal and full-color methods, and holds firmly to corrugated and mailers through normal handling. For an outbound parcel that ships dry and gets scanned within days, paper is all you need — and it keeps your per-label cost at its lowest.

    What BOPP synthetic film does best

    BOPP is waterproof, tear-proof, and resistant to oil, chemicals, UV, and abrasion. It’s the facestock for cold-chain and frozen goods, drums and totes, wash-down environments, outdoor storage, and anything that faces condensation or rough handling. Paired with thermal-transfer or an overlaminate, a BOPP label and its barcode stay intact where paper would smear, wrinkle, or peel off entirely.

    Cost and when the premium is worth it

    BOPP costs meaningfully more per label than paper, so the honest question is whether the conditions justify it. If your label rides in a refrigerated trailer, gets wet, or must survive months on a container, BOPP pays for itself by preventing an unscannable code or a lost shipment. If it ships dry and gets scanned quickly, paper is the smarter spend.

    Matching facestock to the shipment

    As a rule of thumb: paper for dry, short-life, in-transit labels; BOPP for moisture, cold, chemicals, abrasion, and long life. Many operations use both — paper for the bulk of outbound parcels, BOPP for cold-chain, industrial, and outdoor items — and combine the volume to improve pricing on the whole order.

    FactorCoated paperBOPP synthetic film
    Best forDry, in-transit parcelsCold chain, wet, outdoor
    Water / oilVulnerableFully resistant
    Tear / abrasionTears, scuffsTear- & scuff-proof
    Per-label costLowestHigher (worth it in harsh use)
    Print methodsThermal & full-colorThermal-transfer & full-color
    Key takeawayUse coated paper for dry, short-life, in-transit labels; use BOPP synthetic film when moisture, cold, oil, or abrasion would otherwise wreck the label and its barcode.

    Not sure which your shipment needs? Describe the surface, temperature, and moisture your label faces and we’ll spec the facestock and adhesive in your free mockup — and split the run if part of it goes cold-chain.

    More posts

  • A Buyer’s Guide to Barcode Label Compliance — Customized Shipping Labels

    Call or Text us: (929) 605-4397

    HomeBlog › A Buyer’s Guide to Barcode Label Compliance

    Compliance

    A Buyer’s Guide to Barcode Label Compliance

    05/19/2026

    A barcode that looks fine but fails a scan is worse than no barcode at all — it stalls a dock, triggers a chargeback, or gets a shipment refused at a retailer’s door. Barcode compliance is where cheap label suppliers and real label printers part ways, because encoding a code correctly and verifying it are separate, deliberate steps.

    Here’s what actually goes into a barcode label that passes, and how to order one that clears retailer and carrier requirements the first time.

    Pick the right symbology for the job

    Different systems demand different codes. UPC and EAN are for retail point-of-sale; Code 128 and GS1-128 carry logistics data like SSCC, lot, and date for cartons and pallets; QR codes handle track-and-trace and consumer engagement. Using the wrong symbology — or the wrong GS1 application identifiers — is a common cause of rejected shipments. Tell us the receiving system and we’ll encode to its spec.

    Quiet zones, size, and contrast matter

    A scannable barcode needs adequate quiet zones (blank margins), a minimum bar width, and high contrast between bars and background. Squeeze a code too small or print it low-contrast on a busy background and scanners struggle. We size and place codes to the standard so they read on the first pass, on handheld and inline scanners alike.

    Verification is not the same as printing

    Anyone can print a barcode; verifying it is what proves it will scan. A verifier grades a code against ISO/ANSI standards for decodability, contrast, and defects. We can supply verified samples and grade your production run so you know the codes meet retailer requirements — not just that they look right to the eye.

    Serialization and variable data

    Many compliance programs need unit-level serialization — unique numbers or GS1 SSCCs per label. We handle sequential and serialized data, print human-readable text alongside the code, and keep the data structure on file so reorders and audits stay consistent. That traceability is essential in healthcare, food, and regulated retail.

    UseSymbologyNote
    Retail POSUPC / EANPoint-of-sale scanning
    Cartons & palletsGS1-128 / Code 128SSCC, lot, date fields
    Track & traceQR / DataMatrixConsumer & serialization
    Unit traceabilitySerialized GS1Healthcare, food, regulated
    Key takeawayCompliance is encoding to the receiving system’s spec and verifying the code against a standard — not just printing something that looks like a barcode. Ask for verified samples before a big run.

    Send us your symbology, receiving system, and any GS1 or retailer requirements and we’ll encode, verify, and mock up compliant barcode labels within one business day — then keep the data spec on file for painless reorders.

    More posts

  • Custom Shipping Labels for 3PLs & Warehouses — Customized Shipping Labels

    Call or Text us: (929) 605-4397

    HomeBlog › Custom Shipping Labels for 3PLs & Warehouses

    Operations

    Custom Shipping Labels for 3PLs & Warehouses

    05/05/2026

    In a 3PL or warehouse, a label problem isn’t a cosmetic issue — it’s a line stoppage. A roll wound the wrong way, a facestock that jams an applicator, or a barcode that misreads can bring a shift to a halt. Speccing labels correctly for high-volume equipment is one of the highest-leverage things an operations team can get right.

    Here’s how warehouses and 3PLs order shipping and barcode labels that keep the line moving.

    Match the roll to your equipment

    The single most common cause of label downtime is a roll that doesn’t match the printer or applicator: wrong core size, wrong winding direction, wrong outer diameter. Tell us your equipment and we’ll wind rolls to your exact core (1″, 1.5″, or 3″), orientation, and OD so they load and run on the first try — or supply boxed fanfold for high-speed inline printers.

    Choose a facestock that runs clean

    High-volume applicators are unforgiving of stock that curls, tears, or leaves adhesive residue. A quality coated paper feeds cleanly for interior use; BOPP synthetic film runs reliably where labels face moisture or cold. Getting the facestock and liner right prevents jams and the sensor misreads that stop a line, which matters far more at 1,000 labels an hour than at 50.

    Make barcodes scan on the first pass

    In a warehouse, a code that needs a second scan multiplies across thousands of parcels into real lost time. Print barcodes by thermal-transfer for durability, size and place them to standard, and verify them so they read on handheld and inline scanners alike. We can grade your production run so you know the codes meet the throughput your operation needs.

    Standardize and reorder against a spec

    The efficient move is to lock your label specs — size, facestock, core, adhesive, symbology — once, then reorder against that spec every time. We keep it on file so reorders are fast and identical, which keeps your equipment settings stable and your team from troubleshooting a new roll every quarter.

    SpecWhy it mattersWhat to tell us
    Core & windingLoads into your equipment1″/1.5″/3″ core, direction
    FacestockFeeds without jamsPaper or BOPP, conditions
    Print methodBarcode durabilityDirect-thermal or transfer
    BarcodeFirst-pass scansSymbology + verification
    Key takeawayDowntime usually comes from a roll that doesn’t match your equipment. Spec the core, winding, facestock, and barcode to your printers and applicators once, then reorder against that spec.

    Tell us your printers, applicators, and throughput and we’ll spec rolls that load clean and barcodes that scan first-pass — with a verified sample and a mockup within one business day.

    More posts