Most buyers specify a shipping label by its size and its print method, approve the artwork, and consider the job done. Then the first case of rolls arrives, the roll will not seat on the spindle, or the printer feeds two labels at once and reports a media error. The culprit is almost never the label face. It is the roll geometry: the core, the outer diameter, the direction the labels are wound, and how the printer senses where one label ends and the next begins. None of that shows up in a proof, which is exactly why it gets missed. Here is how to specify a thermal label roll so it runs the first time.
Roll geometry decides whether the printer cooperates
A thermal label roll has to physically fit the printer before anything else matters. Two dimensions govern that fit: the core, the cardboard tube the labels are wound onto, and the maximum outer diameter, how large the full roll is before it is used. A roll with the wrong core will not seat on the spindle, and a roll whose full diameter exceeds what the printer’s media compartment can hold simply will not close. Get these two numbers right and most feeding problems disappear; get them wrong and no amount of good artwork saves the run.
Core size and maximum roll diameter
Core size sorts cleanly by printer class. Desktop printers such as the Zebra ZD410 and ZD420 or a Rollo take a 1-inch core and typically accept a roll up to roughly 5 inches in outer diameter. They suit operations printing up to a few hundred labels a day. Industrial printers such as the Zebra ZT230 and ZT411 or comparable TSC units use a 3-inch core and accept a larger roll, commonly up to about 8 inches in diameter, which is what lets them run thousands of labels between reloads. A 3-inch-core roll will not fit a desktop printer’s 1-inch spindle without an adapter, and a small 1-inch roll rattles loosely on an industrial spindle. Match the core to the machine you actually own before you compare anything else.
A 1.5-inch core shows up occasionally on certain mid-range and mobile units, so if your printer is neither a plain desktop nor a full industrial machine, check the spec before assuming one of the two common sizes. Core adapters do exist and can let a smaller roll ride on a larger spindle, but they add a step to every reload and a part that can be lost, so they are a workaround rather than a plan. The cleaner path is to buy the roll in the core the printer was built for. If you run more than one printer model across a warehouse, standardizing on a single printer class, and therefore a single core size, keeps your label inventory from splintering into rolls that only fit one machine.
How many labels a roll holds, and how often you reload
Outer diameter and core together set how many labels a roll carries. For the common 4 by 6 inch shipping label, a 1-inch-core desktop roll typically holds around 250 labels, a fanfold stack holds on the order of 500, and a 3-inch-core industrial roll holds roughly 1,000. Treat these as typical counts rather than guarantees, because liner thickness and the exact roll diameter move them.
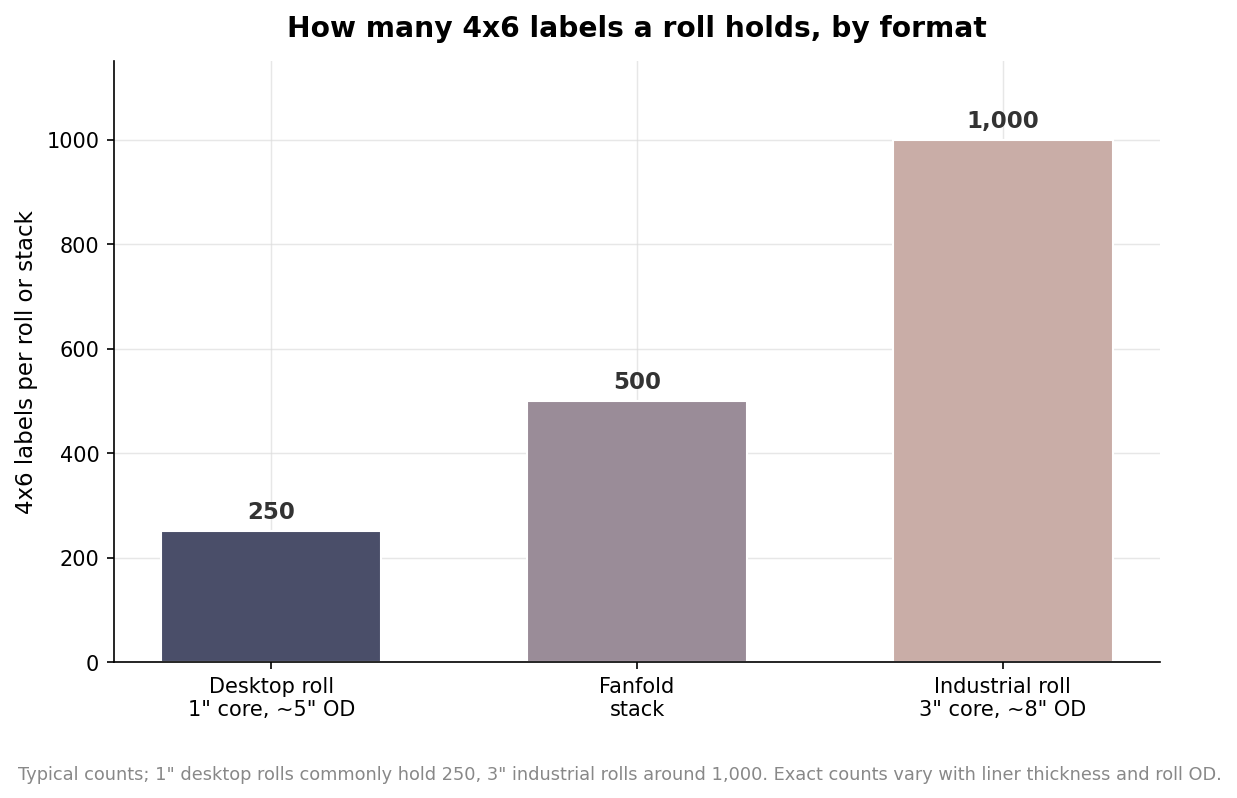
The label count matters less on its own than for what it does to your reload cadence. Every roll change is a small interruption: the operator stops, threads new media, recalibrates, and sometimes wastes a label or two getting alignment back. At low volume that is trivial. At higher volume it compounds fast, which is the real argument for a 3-inch core.
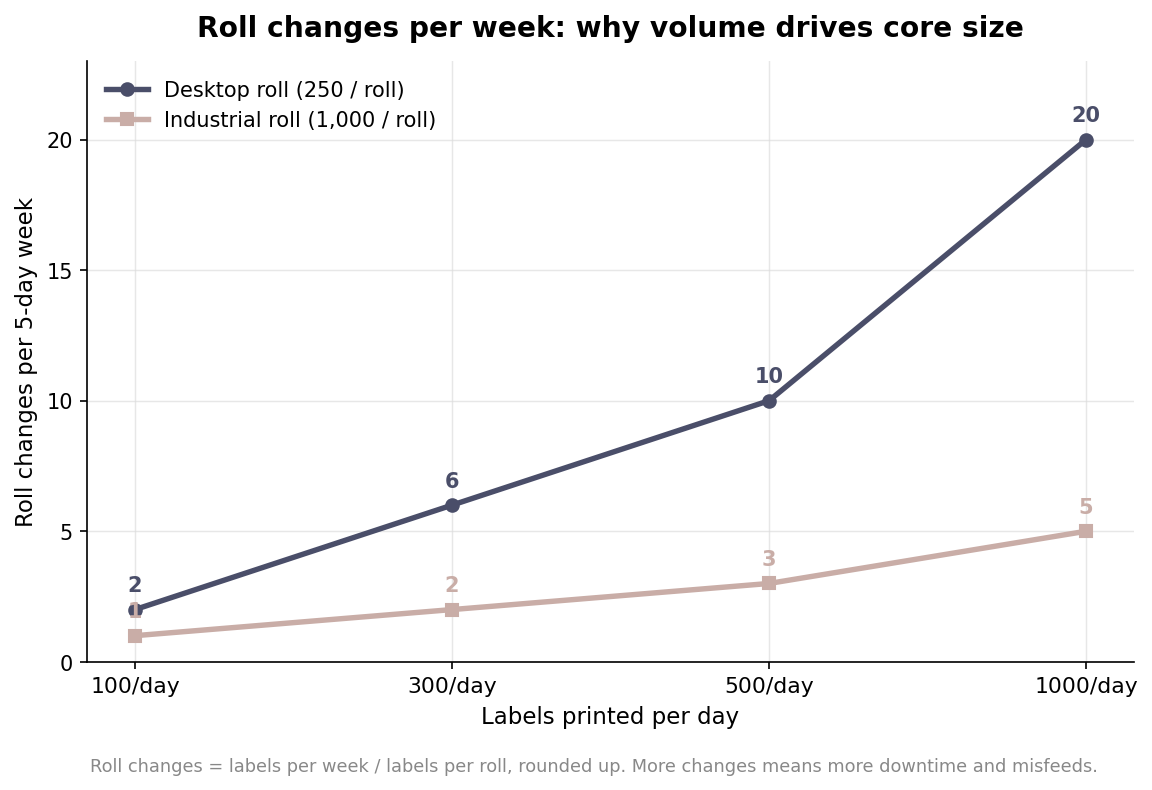
Reading the second chart, a shop printing 500 labels a day burns through ten desktop rolls a week but only three industrial rolls, and at 1,000 a day the gap widens to twenty against five. If your volume is climbing, specifying the larger core is less about the labels and more about buying back the operator’s time and reducing the chances of a misfeed on a busy afternoon.
Wind direction, orientation, and sensing
Wind direction describes which way the label face points as it comes off the roll. Labels are either wound out, with the printable face on the outside of the roll, or wound in, with the face toward the core. The printer’s manual states which winding it expects, and getting it backwards means the thermal head prints on the liner instead of the label. Alongside winding, confirm the label orientation and that there is a perforation or gap between labels so they tear or peel cleanly. The other setting that trips people up is sensing. Die-cut labels leave a small gap of exposed liner between each label, and most printers use a transmissive gap sensor to find it. Some media instead carries a printed black mark on the back that a reflective sensor reads. The two are not interchangeable: continuous or black-mark stock fed to a printer set for gap sensing will not index correctly, so the media type has to match the sensor mode the printer is set to.
Putting it on the spec sheet
When you order, write down six things and the roll will run: label size, core diameter, maximum roll outer diameter, labels per roll, wind direction, and sensing type, plus whether you want roll or fanfold. Fanfold is worth a mention here because a fanfold stack sits outside the printer, runs cooler, curls less, and is not limited by media-compartment diameter, which makes it a quiet upgrade for high-volume desktop setups. Confirm each of those six against your specific printer model before approving a production run, and the labels that arrive will load, index, and print without a single media error on the first case.