Almost every shipping label question eventually lands on one number: the size. Order the wrong dimensions and the carrier’s generated label will not fit the media, barcodes get clipped at the edges, or you burn through rolls twice as fast as you planned. This is a reference to the sizes that actually matter, why one of them dominates, and how the roll or fanfold format underneath the size changes what your printer can do. Sizes here are written width by height in inches, the way label suppliers quote them.
Why 4×6 became the default
The 4×6 inch label, about 100 by 150 millimeters, is the standard used by essentially every major carrier, including USPS, UPS, FedEx, and DHL, and it is what marketplace platforms like Amazon expect for fulfillment. That near-universal agreement is the whole point: a 4×6 gives enough room for the routing barcode, the tracking number, the addresses, and the carrier’s service markings without crowding, and it matches the print width of the desktop thermal printers most sellers own. If you do nothing else right, ordering 4×6 direct thermal labels will keep you compatible with the label your shipping software spits out. A close cousin, the 4×6.75, adds a tear-off documentation tab that some FedEx and UPS workflows use, so check whether your carrier account generates that longer format before you commit to a size.
The size chart, from 2×1 to 4×8
Below the shipping standard sits a whole family of smaller formats built for different jobs. A 2.25×1.25 is the classic DYMO-style address and UPC label. A 2×1 is a tight barcode or SKU sticker, a 3×1 suits a simple address line, and a 3×2 is a common product or warehouse bin label. Move up in size and you get the 4×4 or 4×4.25 for small boxes and local parcels, the 6×3 for tubes and long packages, and the 4×8 for heavier B2B and international shipments that need extra room for customs and handling marks. There is also the 8.5×11 letter sheet, printed on a laser or inkjet with multiple labels ganged per page, which sits well outside the thermal-roll world but still shows up in low-volume and office settings.
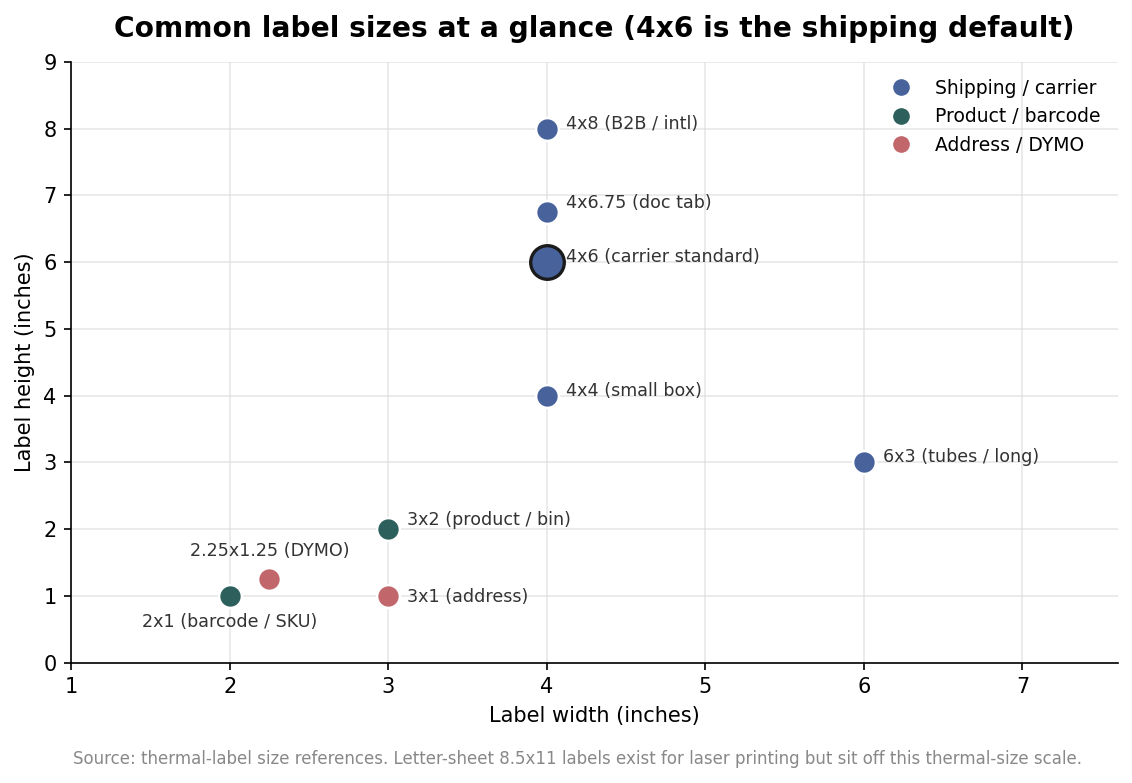
The pattern to notice is that width tends to cluster at four inches because that is the working width of the machines doing the printing, while height stretches to suit the amount of information the label has to carry. When in doubt, pick the smallest size that comfortably holds your content plus a clear margin, because a label that is larger than it needs to be wastes stock and can overhang the package edge.
Rolls, cores, and fanfold: the format under the size
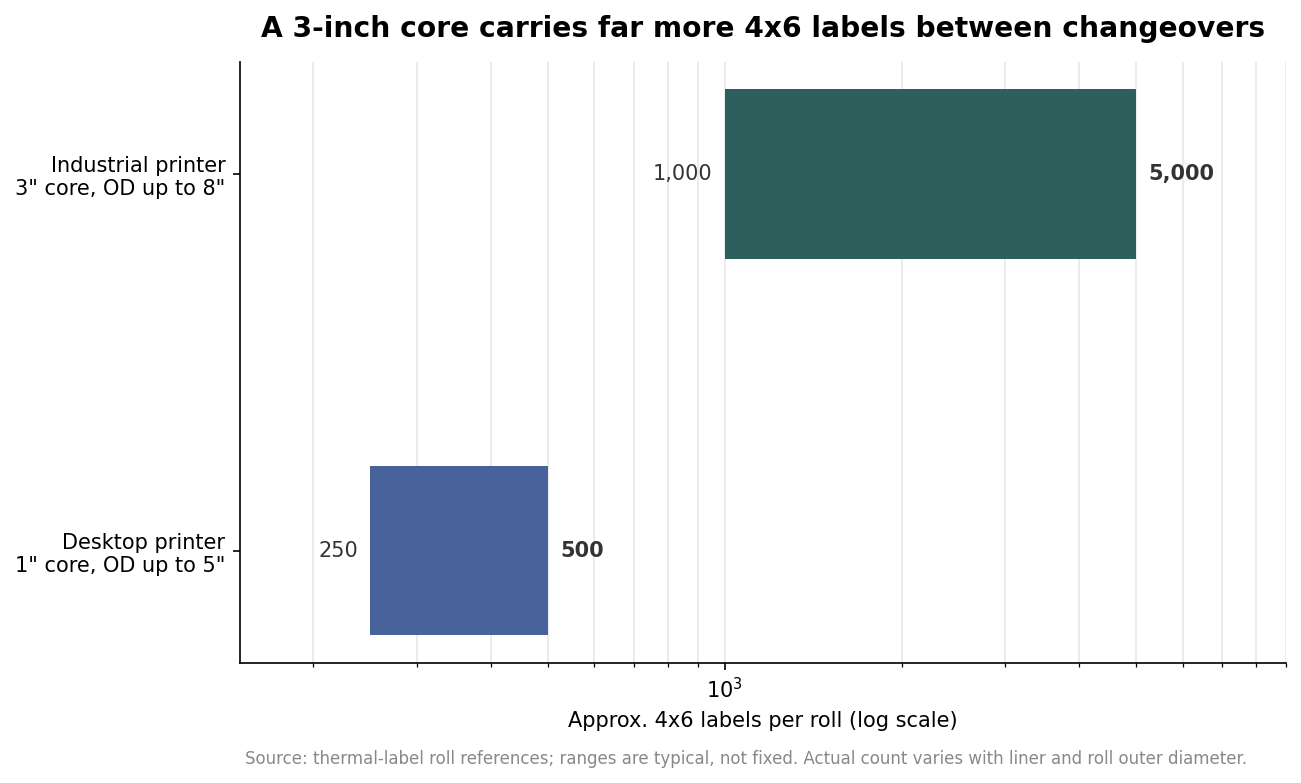
Two labels can share the same 4×6 dimensions and still behave very differently depending on how they are wound and fed. Roll labels are specified by their core, the cardboard tube in the center, and their outer diameter. Desktop printers such as the Rollo, DYMO 4XL, and Zebra ZD421 take a one-inch core with an outer diameter up to about five inches, which works out to roughly 250 to 500 4×6 labels on a roll. Industrial machines like the Zebra ZT411 or Honeywell PM43 use a three-inch core and accept much larger rolls, up to about an eight-inch outer diameter, holding somewhere in the range of 1,000 to 5,000 labels before a changeover.
Fanfold labels take a different approach entirely, stacking flat and feeding from behind or beneath the printer rather than off a spool. The advantage is volume without interruption: a single fanfold stack can hold thousands of labels, and because it lies flat there is no curl to fight, which many high-throughput warehouses prefer. The trade-off is the desk space the stack occupies and a feed path that not every desktop printer supports. If you print in bursts of a few dozen a day, a one-inch-core roll is simpler; if you are labeling pallets of orders, the three-inch roll or a fanfold box keeps you from reloading every hour.
Match the size to the job and the printer
Work backward from two constraints. First, the label your carrier or platform generates, since that fixes the shipping label at 4×6 in most cases and there is little value in fighting it. Second, the print width of your hardware, because a desktop thermal printer tops out around a four-inch label width and will simply not run a five- or six-inch-wide sheet no matter what size file you send it. For the smaller product, barcode, and address labels, choose by content: a single scannable barcode with a short human-readable line fits a 2×1, while a barcode plus a few lines of product detail wants a 3×2. Leave a quiet zone, a clear unprinted margin of roughly an eighth of an inch, around any barcode so scanners can find the start and stop bars reliably.
One last practical note on ordering: confirm whether your printer is direct thermal or thermal transfer before buying stock, because the media is not interchangeable even at identical sizes, and confirm the core size your printer’s spindle actually accepts. Figures here for roll counts and diameters are typical rather than fixed, and they shift with liner thickness and how tightly a roll is wound, so treat them as planning numbers and verify against the exact product you order. Get the size and format right up front and the rest of the label, from artwork to scan rate, gets much easier to control.